
Data analysis#
During this workshop, we will do a mini research project to try out our directory structure. In 1929, Edwin Hubble discovered that the universe is expanding. He compiled a dataset from velocity and distance measurements of a small set of galaxies. When plotting distance versus velocity, it was clear that galaxies that are further away also move away from us faster. This resulted in the famous Hubble-Lemaître expansion law.
We are going to do his experiment again with the same set of galaxies and modern measurements of distance and velocity. Let’s see if the Hubble-Lemaître law still applies!
Obtaining the data#
To get recent astronomical data we can make use of Astroquery, and especially the Simbad module that gives access to the online Simbad astronomical database.
To speed things up, we already prepared a script to retrieve the data that we need. The list of objects that Hubble used are already included in the script. We will use the Astropy package to save the data table into FITS format, which is a commonly used file format in Astronomy.
EXERCISE
Download and/or copy the hubblequery.py script to your
project directory. Where would you put this script in your directory
structure? Also add the script to your git repository.
You can download the hubblequery.py
script or copy/paste it from below:
#!/usr/bin/env python

from astroquery.simbad import Simbad
from astropy import constants as const
from astropy.table import QTable


def main():
    """This script retrieves the latest velocities and distances for the objects that
    Edwin Hubble used to find the famous Hubble universe expansion law in 1929."""

    # These are the galaxies that Edwin Hubble used
    hubble_objects = ['NGC 278', 'NGC 404', 'NGC 584', 'NGC 936', 'NGC 1023', 'NGC 1700',
                      'NGC 2681', 'NGC 2683', 'NGC 2841', 'NGC 3034', 'NGC 3115', 'NGC 3368',
                      'NGC 3379', 'NGC 3489', 'NGC 3521', 'NGC 3623', 'NGC 4111', 'NGC 4526',
                      'NGC 4565', 'NGC 4594', 'NGC 5005', 'NGC 5866']

    # Retrieve the data from SIMBAD using astroquery.Simbad
    simbad = Simbad()
    simbad.add_votable_fields('distance', 'velocity')
    hubble_data = simbad.query_objects(hubble_objects)

    # Convert redshifts to velocities and convert MAIN_ID to strings
    c = const.c.to('km/s')
    for i in range(hubble_data['RVZ_RADVEL'].size):
        # If the datatype is redshift (z), then multiply with c to obtain velocity in km/s
        if hubble_data['RVZ_TYPE'][i] == 'z':
            hubble_data['RVZ_RADVEL'][i] = hubble_data['RVZ_RADVEL'][i] * c.value
        # Convert the column with source IDs from object to strings (otherwise conversion to FITS fails)
        hubble_data['MAIN_ID'][i] = str(hubble_data['MAIN_ID'][i])

    # Check that we get some data back
    print(hubble_data['MAIN_ID', 'Distance_distance', 'Distance_unit', 'RVZ_RADVEL'])

    # Create a new astropy table with the required columns
    newtable = QTable([hubble_data['MAIN_ID'], hubble_data['Distance_distance'],
                      hubble_data['Distance_unit'], hubble_data['RVZ_RADVEL']],
                      names=('Object', 'Distance', 'Distance_unit', 'Velocity'),
                      dtype=('U15', 'f8', 'U4', 'f8'))

    # Write the data to a FITS file
    newtable.write('hubble_data.fits', format='fits')

if __name__ == "__main__":
    main()
EXERCISE
Try to run the script and obtain the hubble_data.fits file.
This script needs astroquery and astropy. Add these packages to the list
of software dependencies. Secondly, where would you save hubble_data.fits in
your project directory structure?
If you are unable to generate the hubble_data.fits file, or are a bit behind,
then you can download hubble_data.fits
here.
EXERCISE
Open the README.md file at the top of our project directory. Add
information about where the hubblequery.py script and the hubble_data.fits
file are located and how to run them. Also add the dependencies of the script to
the README.
Fitting the data#
Hubble’s law is a linear relation. The velocity (\(v\)) is equal to the Hubble constant (\(H_0\)) times the distance (\(D\)), leading to the equation:
Since we have velocity and distance data of a number of galaxies, we can determine the Hubble constant (\(H_0\)). To do this, we need to fit the data points with a straight line through the origin.
We have prepared a small script that fits the data with a straight line
and plots the result. You can download hubblefit.py
here.
Let us briefly go through the steps of the script.
The first step is to read in the Hubble data:
# Read the hubble data table
hubble_data = Table.read('hubble_data.fits')
Now that we have the data table read, we can fit the distance and velocity to a
straight line. We will use the numpy.linalg.lstsq function from numpy for that.
Somehow, the lstsq function requires the x coordinates to be in a 2D array.
Unfortunately, our distances are in a 1D array, so we need to add an empty second
dimension first:
distance = np.array(hubble_data['Distance'])
distance = distance[:, np.newaxis]
And then fit the distance vs. velocity with a straight line:
(a, res, rank, s) = np.linalg.lstsq(distance, hubble_data['Velocity'], rcond=None)
The variable a contains the best fit value. From the best fit value we can
calculate the Hubble constant and the age of the Universe. To convert the units
Megaparsec (Mpc), kilometers (km) and seconds (s) into a more convenient unit for
the Universe age (Gigayear, Gyr), we use the astropy units module:
# Calculate the age of the universe
h = a[0] * u.km / u.s / u.Mpc
age = 1.0 / h
print("Hubble constant = {0:.2f}".format(h))
print("Age of Universe = {0:.2f}".format(age.to(u.Gyr)))
In the last step, we create a plot showing the galaxy data, our best fit, and the calculated results for the Hubble constant and the age of the Universe:
# Plot the galaxy data, the fit and show the results
plt.plot(hubble_data['Distance'], hubble_data['Velocity'], 'ob')
plt.plot(x, y, '-r')
plt.xlabel("Distance (Mpc)")
plt.ylabel("Velocity (km/s)")
plt.text(25., 300., "H$_0$ = {0:.2f} km/s/Mpc".format(h.value))
plt.text(25., 150., "Age = {0:.2f}".format(age.to(u.Gyr)))
plt.show()
This is already a nice script, but there are a number of things that we can improve. We will do this in the next sections.
Note
After finishing each of the following sections, you could create and push a new git commit to keep track of your changes to the script!
Note
The code samples can be copy/pasted from this page to speed up the teaching.
Accessing files through an environment variable#
Currently, the script assumes that hubble_data.fits is in the same directory
as the script. If we would just set the full path to the file in our program,
then the program likely does not work if everything is copied to another machine
(for example as part of a reproduction package).
In a previous section (Project directory structure), we defined the location of the project
directory and data directory in the file env.sh. Make sure that the PROJECT_DIR,
PROJECT_DATA_DIR, and PYTHONPATH variables are correctly defined and make
sure that env.sh is sourced (source env.sh).
In our own project python module, there is a class called Paths that we can use.
See the file src/hubble/paths.py. This class reads the environment variables
that we set and converts them to Python variables that we can use in our scripts or
notebooks.
We can use the path set in the environment variable using the Paths class. To
use the class, we first need to import it. And, to be able to append things to the
path, we also load os at the start of the script:
import os
from hubble.paths import Paths
In the program, we can now use the Paths() class and obtain the project_dir
and project_data_dir from the environment:
# First option: Read the path to Hubble data file from an environment variable
# We define the environment variable PROJECT_DATA_DIR in env.sh to point to
# the data/external directory.
p = Paths()
hubble_file = os.path.join(paths.project_data_dir, 'raw/hubble_data.fits')
The hubble data file can now be read using this line:
hubble_data = Table.read(hubble_file)
Accessing files through the command line#
There is also a second option if you want to be able to load other data files as well. An easy way to reach this versatility is to use the standard argparse module in Python. This module is capable of reading input from the command line when the script is run. It is important to note that this does not work in Jupyter notebooks. We have to create a script. If we are successful, we can run the script like this:
user@terminal:~> hubblefit hubble_data.fits
To use argparse successfully, we need to import the module and create a new function
that will handle the command-line options. Loading argparse is easy:
import argparse
At the end of the file, we create a new function that looks like this:
def hubblefit_arguments():
    """Obtain command line arguments."""
    parser = argparse.ArgumentParser(description="Hubble expansion fit.")
    parser.add_argument('datafile', help='Input FITS file containing distances and velocities for galaxies', type=str, required=True)
    return parser
In our main program, we can now obtain the variables from the command line like this:
# Obtain command line arguments
parser = hubblefit_arguments()
args = parser.parse_args()
The args object now contains all the command line variables defined in the hubfit_arguments
function. With that in mind, we can now check if the file provided by the user exists and open
the table:
# We check if the input datafile exists
if not os.path.isfile(args.datafile):
    print("Error: Input data file not found.")
    return

# Read the hubble data table
hubble_data = Table.read(args.datafile)
Save the result to a fits file#
It would be great to save the results in a way that they are machine readable again, including their units. We can do that by saving the numbers in a FITS table. We can make that optional by adding an argparse argument for it as well.
Add this at the end of the hubblefit() function:
# (Optional) Save the result to a FITS file
if args.save:
    table = QTable()
    table['H_0'] = np.array([h.value]) * h.unit
    table['Age'] = np.array([age.to(u.Gyr).value]) * age.to(u.Gyr).unit
    table.write(args.save, format='fits')
And add this line to hubblefit_arguments() before the return statement:
parser.add_argument('--save', help='Save the result to a named file', type=str)
Make the plot optional#
Add the line if args.plot: before the plotting lines and indent all the plot commmands:
# (Optional) Plot the galaxy data, the fit and show the results
if args.plot:
    plt.plot(hubble_data['Distance'], hubble_data['Velocity'], 'ob')
    plt.plot(x, y, '-r')
    plt.xlabel("Distance (Mpc)")
    plt.ylabel("Velocity (km/s)")
    plt.text(25., 300., "H$_0$ = {0:.2f} km/s/Mpc".format(h.value))
    plt.text(25., 150., "Age = {0:.2f}".format(age.to(u.Gyr)))
    plt.show()
Add a line to the hubblefit_arguments() section to create the --plot flag:
parser.add_argument('--plot', help='Plot the data and fit.', dest="plot", action="store_true", default=False)
If everything goes well, running python hubblefit.py hubble_data.fits --plot should yield a
plot like this:
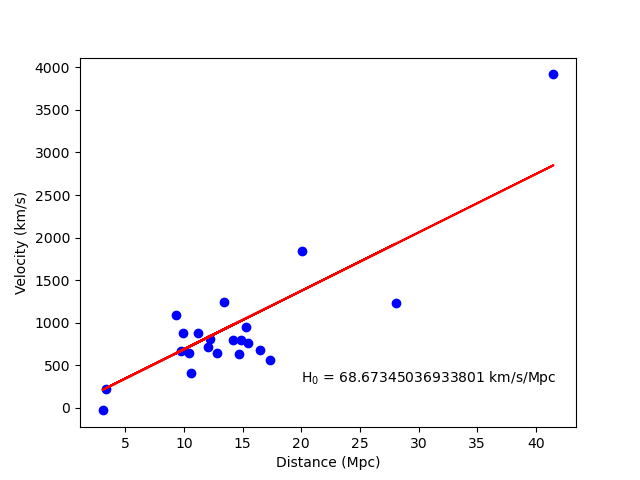
The final script can be downloaded hubblefit_improved.py here.
Python package and git#
When you have a stand-alone script with command-line input options, you can add it as
an executable script in your own python package. Open src/pyproject.toml and add
a line to [project.scripts]:
[project.scripts]
hello = 'hubble.scripts.hello:hello'
hubblefit = 'hubble.scripts.hubblefit:hubblefit'
The pyproject.toml file contains all the information needed for the Python build
module to create a Python package. A Python package can be helpful if you want to run
your code on a different machine.
For the package installation, it is necessary to also install the packages that your
script depends on, like astropy and astroquery. You can add these dependencies to
pyproject.toml in the [project] section:
[project]
name = 'hubble'
version = "0.1"
dependencies = [
    "argparse", "astropy", "astroquery", "matplotlib"
]
You install your python module in your python environment with the following commands
(in the directory where pyproject.toml resides):
python -m build && pip install dist/hubble.tar.gz
the hubblefit executable will always be available in your environment. It will be installed in the path.
Git#
Of course, each time you change your script, and especially when it is finished, do not forget to upload your changes to the git repository:
git add src/hubble/scripts/hubblefit.py src/pyproject.toml
git commit -m "Added hubblefit script to my project."
git push
Readme#
Regularly updating your README.md with information is always a good idea.
EXERCISE
Open the README.md file again in the top of our project directory. Write a couple of lines about the hubblefit script in the dataproducts and results section. The most important information is what the script does and how to use it.